Hyundai Santa Cruz: Timing System / Timing Chain Cover

• In case of removing the high pressure fuel pump, high pressure fuel pipe, delivery pipe, and injector, there may be injury caused by leakage of the high pressure fuel. So don’t do any repair work right after engine stops.

• Use fender covers to avoid damaging painted surfaces.
• To avoid damage, unplug the wiring connectors carefully while holding the connector portion.
• Remove the variable force solenoid valve (VFS) and E-CVVT cover first when removing the timing chain cover.

• Mark all wiring and hoses to avoid misconnection.
1.Disconnect the battery negative terminal.
2.Remove the engine cover.(Refer to Engine And Transaxle Assembly - "Engine Cover")
3.Remove the engine room under cover.(Refer to Engine And Transaxle Assembly - "Engine Room Under Cover")
4.Remove the drive belt and water pump belt.(Refer to Drive Belt System - "Drive Belt")
5.Remove the drive belt tensioner.(Refer to Drive Belt System - "Drive Belt Tensioner")
6.Remove the crankshaft damper pulley.(Refer to Drive Belt System - "Crankshaft Damper Pulley")
7.Remove the engine oil level gauge.(Refer to Lubrication System - "Oil Level Gauge")
8.Remove the vacuum pump.(Refer to Brake System - "Vacuum Pump")
9.Remove the cylinder head cover.(Refer to Cylinder Head Assembly - "Cylinder Head Cover")
10.Drain the engine oil.(Refer to Lubrication System - "Engine Oil")
11.Remove the A/C compressor mounting bolts.(Refer to Heating, Ventilation and Air Conditioning System - "Compressor")
12.Remove the A/C compressor mounting bracket (A).
Tightening torque :19.6 - 23.5 N.m (2.0 - 2.4 kgf.m, 14.46 - 17.35 Ib.ft)
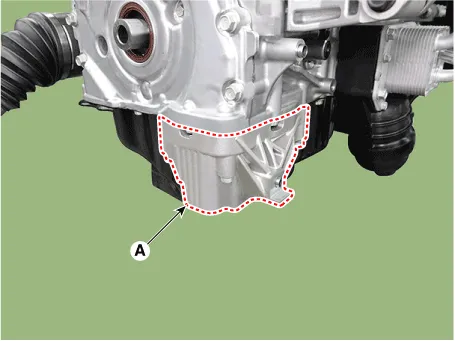
13.Remove the oil pan.(Refer to Lubrication System - "Oil Pan")
14.Install the jack to the edge of lower crankcase to support the engine.

• Put the rubber block between the jack and lower crankcase to avoid damaging the lower crankcase.
• Be careful not to damage the balance shaft and oil pump.
15.Remove the engine mounting support bracket and engine mounting bracket.(Refer to Engine And Transaxle Assembly - "Engine Mounting")
16.Disconnect the engine ground cable (A).
Tightening torque :10.8 - 13.7 N.m (1.1 - 1.4 kgf.m, 8.0 - 10.1 lb-ft)
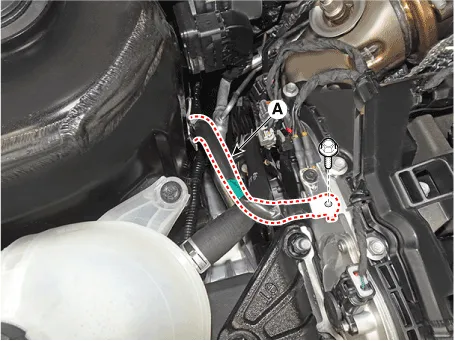
17.Remove the engine support bracket (A).
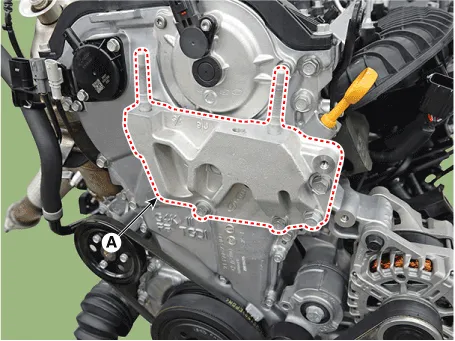
18.Remove the E-CVVT cover (A).
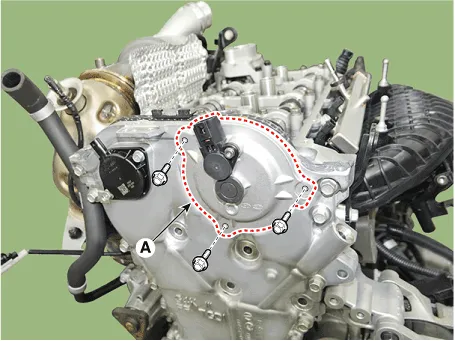

• Be careful not to apply external force to the brush after removing the cover.
19.Remove the variable force solenoid valve (VFS) (A).
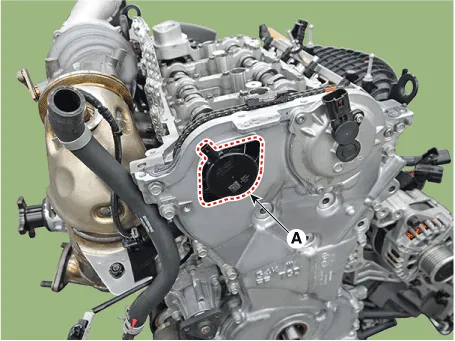

• When removing the timing chain cover, be sure to remove the variable force solenoid valve (VFS) first.
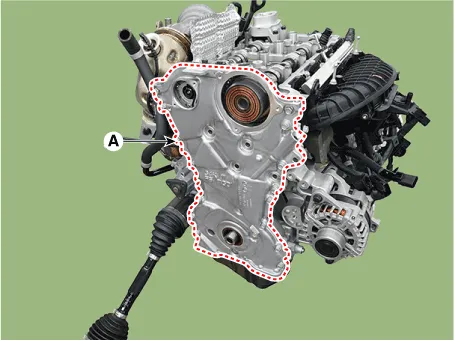
20.Remove the timing chain cover (A).
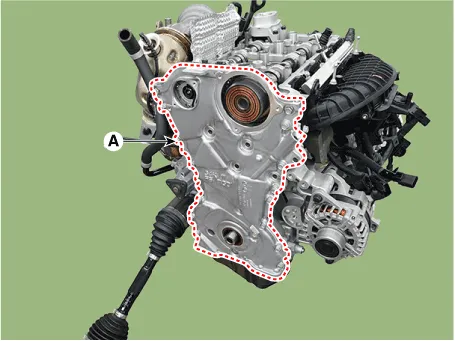

• When removing the timing chain cover, be careful not to damage the contact surfaces of cylinder block, cylinder head and lower crankcase.
1.Check if the oil flows inside the E-CVVT cover.If the oil flows inside the E-CVVT cover, replace the E-CVVT cover
2.Check the connector brush wear condition.If the brush is worn down, replace the E-CVVT cover.
1.Install the timing chain cover.
(1)Make sure to remove the hardening sealant, foreign materials, oil, dust and moisture gathered in the liquid gasket sealing surface (cam carrier, cylinder head, cylinder block, lower crankcase). Then, spray the cleaner on the sealing surface and wipe off with a clean towel.
(2)Apply a sealant for liquid gasket to the interface between the cam carrier, cylinder head,cylinder block and lower crankcase.
Bead width : Ø 3.0 - 5.0 mm (0.11 - 0.19 in.)Sealant : MS 721-40 AA or AA0
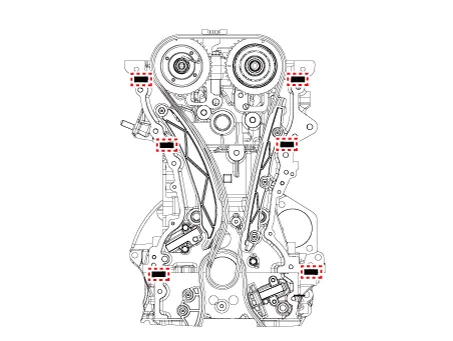
(3)The part must be assembled within 5 minutes after sealant was applied on the mounting surface of liquid gasket of timing chain cover.
Bead width : Ø 3.0 - 5.0 mm (0.11 - 0.19 in.)Sealant : MS 721-40 AA or AA0
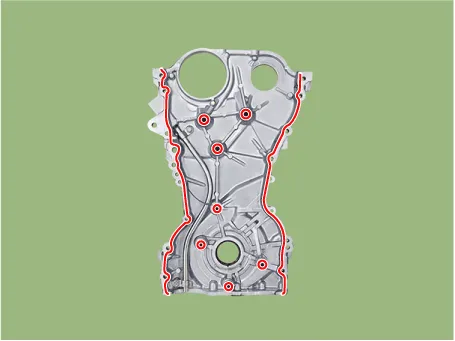
(4)The dowel pins on the cylinder block and holes on the timing chain cover should be used as a reference in order to assemble the timing chain cover (A) to be in exact position.
Tightening torque :Bolt (B) : 9.8 - 11.7 N.m (1.0 - 1.2 kgf.m, 7.2 - 8.6 Ib.ft)Bolt (C) : 18.6 - 22.5 N.m (1.9 - 2.3 kgf.m, 13.7 - 16.6 Ib.ft)Bolt (D) : 9.8 - 11.7 N.m (1.0 - 1.2 kgf.m, 7.2 - 8.6 Ib.ft)
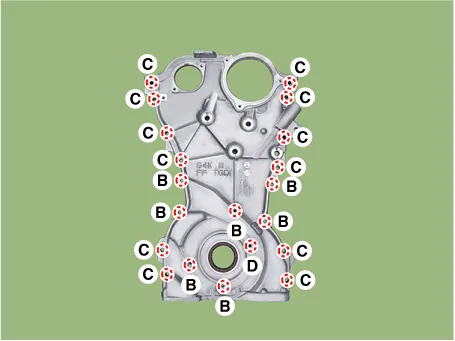

• The engine starting or pressure tests should not be performed within 30 minutes after the timing chain cover was assembled.
• Always install the timing chain cover mounting bolt (D) with a new one.
2.Replace the front oil seal if neccesary.(Refer to Timing System - "Front oil Seal")
3.Remove it by breaking the center of E-CVVT motor plug (A).
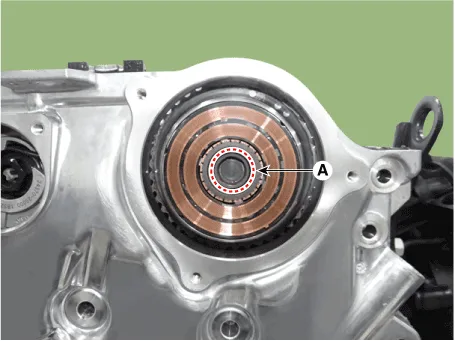

• Remove after 30 minutes of switching "OFF" the ignition to drain out the oil inside the E-CVVT motor plug.
• Do not tilt the front of engine (timing chain cover side) downward as residual oil may flow outduring E-CVVT motor plug removal.
• If oil flows out during E-CVVT motor plug removal, wipe off immediately and block the motorshaft inlet with a clean towel.
4.Clean the E-CVVT motor plug mounting surface (A) with oil cleaner.
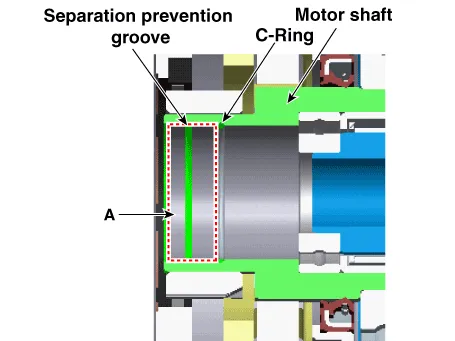

• If the surface is not cleaned, E-CVVT motor plug may be separated due to diminished separation force from residual oil.
• When spraying oil cleaner, block around the motor shaft inlet and rotor gap with a clean towel to prevent inflow of oil from flowing into the rotor gap.
5.When reusing the E-CVVT cover, inspect the below items.
(1)If there is sign of leakage from inside the E-CVVT cover, replace it with a new one.
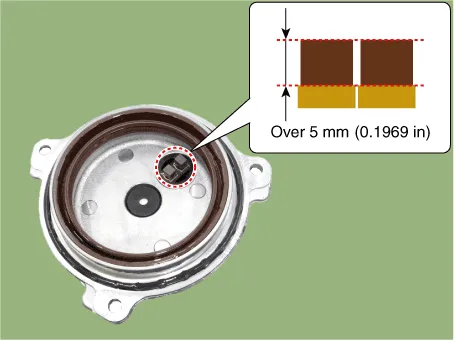
(2)Check the connector brush wear condition.
Specification : Over 5 mm (0.1969 in.)
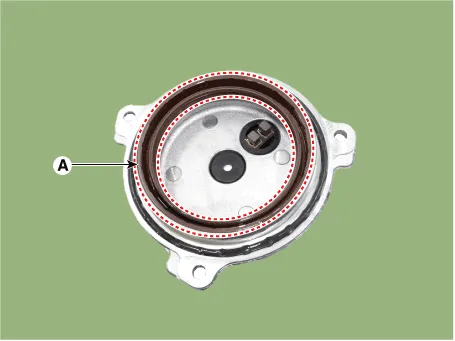
(3)Check for damaged oil seal and replace any damaged E-CVVT cover with a new one.
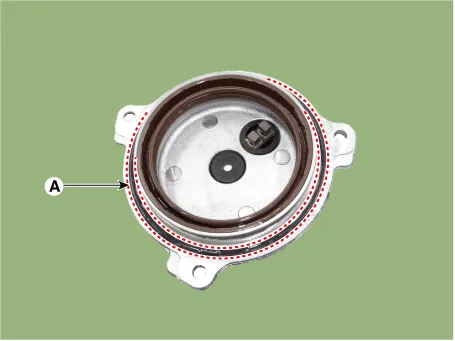
(4)After inspecting E-CVVT, if no problem is found, replace the o-ring (A) with a new one.
6.Install the E-CVVT cover.
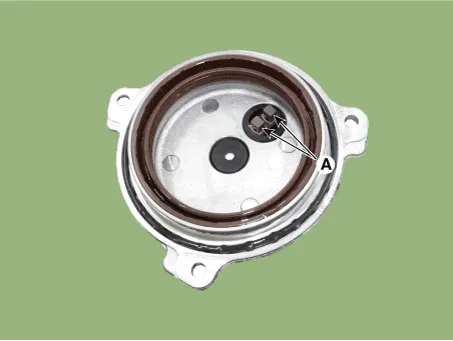
(1)Apply engine oil to the oil seal lip (A).
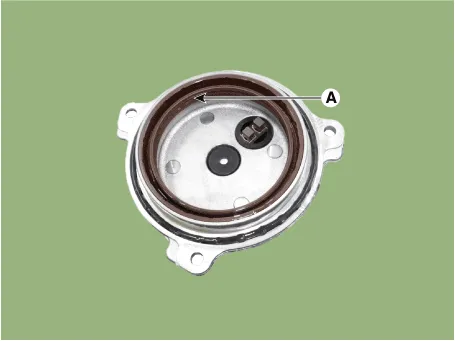

• When applying oil, keep the connector brush (A) clean from foreign materials.
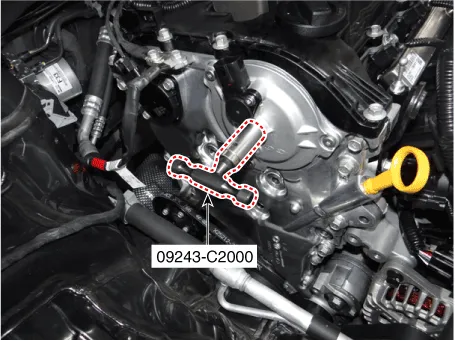
(2)Insert the SST (09243-C2000) into the E-CVVT motor shaft.
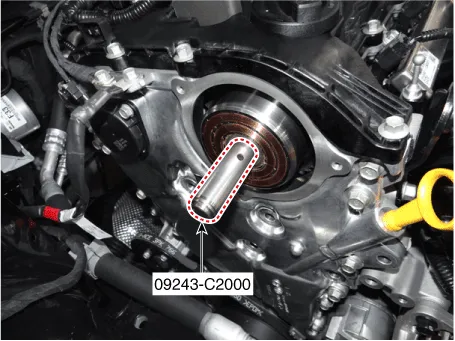

• Correctly mount SST onto the motor shaft.
(3)Slowly push the E-CVVT cover (A) until it is flushed with the timing chain cover surface.
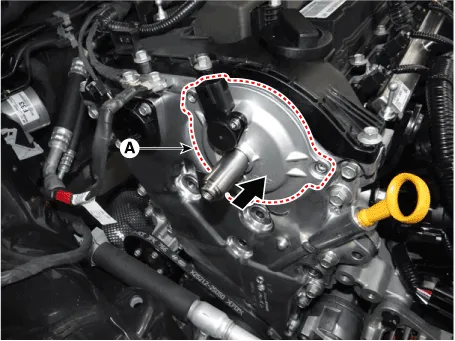

• Installing the E-CVVT cover without SST may cause oil leakage inside the E-CVVT motor due to damaged or separated E-CVVT oil seal.
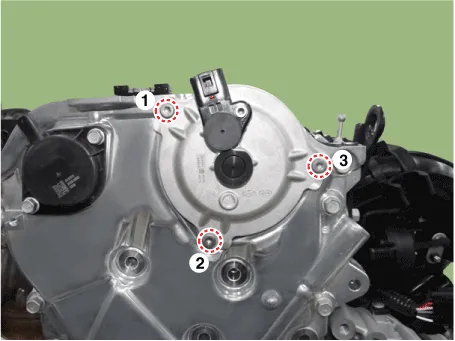
(4)Pre-tighten the bolts in the below sequence, and then remove the SST (09243-C2000).
Tightening torque :0.9 - 1.9 N.m (0.1 - 0.2 kgf.m, 0.7 - 1.4 Ib.ft)
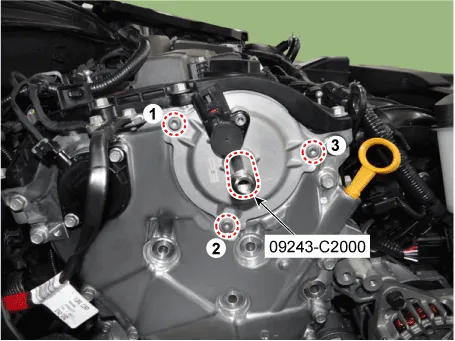
(5)Tighten the bolts to the specified torque in the sequence below.
Tightening torque : 9.8 - 11.7 N.m (1.0 - 1.2 kgf.m, 7.2 - 8.6 Ib.ft)
7.Install the E-CVVT plug.
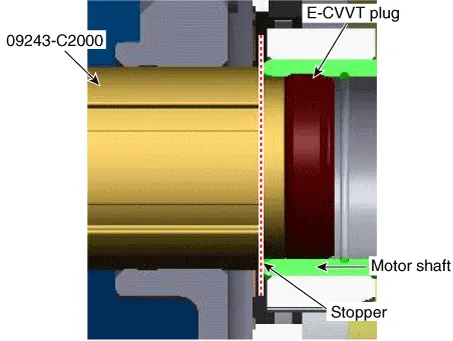
(1)Insert the plug into the E-CVVT cover hole using SST (09243-C2000).
(2)Mount the stopper of SST so that it sits at the end of E-CVVT motor shaft.
8.Inspect the pressed depth of E-CVVT plug.
(1)By using a steel ruler, measure the distance from E-CVVT cover center boss to the end of motor shaft (①).
(2)By using a steel ruler, measure the distance from E-CVVT cover center boss to the end of E-CVVT plug (②).
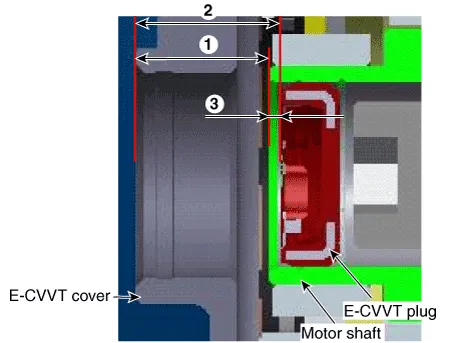
(3)Calculate the pressed depth (③) of motor plug.If out of specification, reinstall after replacing the E-CVVT plug with a new one.
Pressed depth : ③ = ② - ①Specification : 1.1 - 2.1 mm (0.0433 - 0.0826 in.)
9.Insert the E-CVVT cover plug so that the protrusion reach to E-CVVT cover groove correctly.
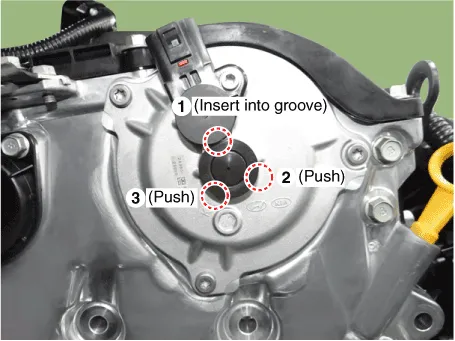

• Check how much protrude after installing the E-CVVT plug.
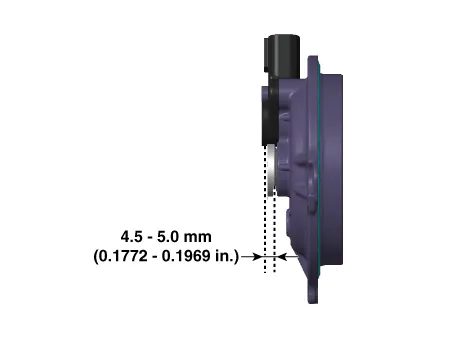
• Be careful that the plug is not inserted inside E-CVVT cover beyond the regulated range.
10.Install the variable force solenoid valve (VFS) (A).
Tightening torque : 9.8 - 11.7 N.m (1.0 - 1.2 kgf.m, 7.2 - 8.6 Ib.ft)
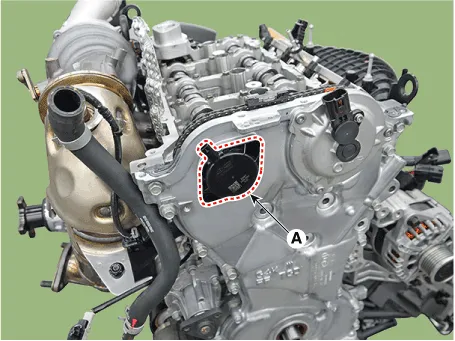

• Do not reuse the variable force solenoid valve (VFS) if it is dropped.
• When installing the Variable Force Solenoid Valve (VFS), pay attention to the following points.
1)After replacing the variable force solenoid valve (VSF) O-ring (A) with a new one, apply engine oil to the new O-ring (A).
2)Push the variable force solenoid valve (VFS) to the end of the timing chain cover mounting surface, and then pre-tighten the bolts.
3)Tighten the variable force solenoid valve (VFS) with specified torque.
11.Install the engine support bracket (A).
Tightening torque : 96.1 - 114.7 N.m (4.0 - 4.5 kgf.m, 70.8 - 84.6 Ib.ft)
(1)Pre-tighten the bolts in the order of 1→2→3
(2)Turn the bracket counterclockwise and install the bolt 1.
(3)Install in order of 2 → 3 → 4 → 5 →6 .
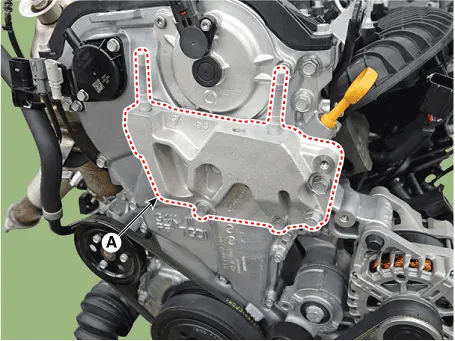
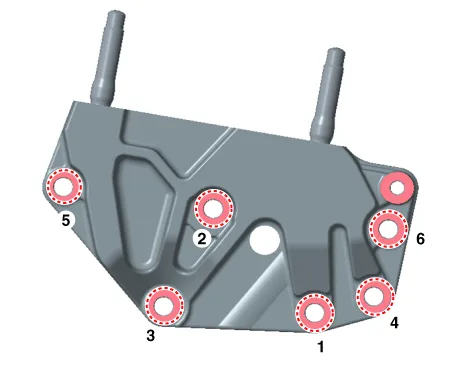
12.Install in the reverse order of removal.
 Front Oil Seal
- Replacement
1.Remove the crankshaft damper pulley.(Refer to Drive Belt System - "Crankshaft Damper Pulley")
2.Remove the front oil seal (A).
3.Install the new front oil seal.(1)Apply engine ...
 Timing Chain
- Removal
1.Set No.1 cylinder to TDC. Turn the crankshaft damper pulley
clockwise and align its groove with the timing mark "T" of the lower
timing chain cover.
2.Remove the timing chain cov ...
Other information:
Hyundai Santa Cruz 2021-2025 Owners Manual: Winter Precautions
Use high quality ethylene glycol coolant
Your vehicle is delivered with high
quality ethylene glycol coolant in the
cooling system. It is the only type of
coolant that should be used because it
helps prevent corrosion in the cooling
system, lubricates the water pump and
prevents freezing. Be s ...
Hyundai Santa Cruz (NX4A OB) 2021-2025 Service Manual: Hood Latch Release Handle
- Component Location
1. Hood latch release handle
- Replacement
1.Using a socket, remove the hood release handle (A).
2.To install, reverse removal procedure.
• Make sure the hood latch cable is connected properly.
• Make sure the hood locks / unlocks and o ...
