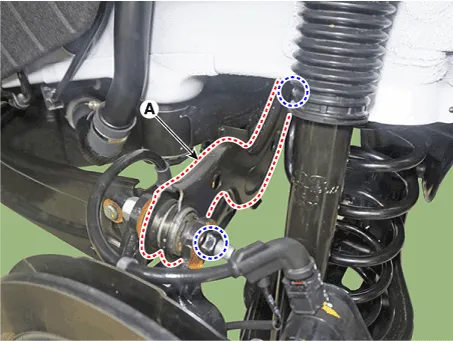
Hyundai Santa Cruz: Rear Suspension System / Rear Upper Arm

• When lifting a vehicle using a lift, be careful not to damage the lower parts of the vehicle (floor under cover, fuel filter, fuel tank, canister).(Refer to General Information - "Lift and Support Points")
1.Loosen the rear wheel nuts slightly.Raise the vehicle, and make sure it is securely supported.
2.Remove the rear wheel and tire.(Refer to Tires/Wheels - "Wheel")
3.Remove the rear upper arm (A) after loosening the mounting bolts and nuts.
Tightening torque : 156.9 - 176.5 N.m (16.0 - 18.0 kgf.m, 115.7 - 130.2 lb-ft)

• Set up the transmission jack under the lower arm in order to remove it in no-load condition.

1.Check the bushing for wear and deterioration.
2.Check the rear upper arm or damage and deformation.
3.Check for all bolts and nut.
1.To install, reverse the removal procedures.
2.Check the alignment.(Refer to Suspension System - "Alignment")
 Rear Shock Absorber
- Components
1. Lock nut2. Insulator assembly 3. Dust cover 4. Rear shock absorber
- Removal
• When lifting a vehicle using a lift, be careful not to damage
the lo ...
 Rear Lower Arm
- Removal
• When lifting a vehicle using a lift, be careful not to damage
the lower parts of the vehicle (floor under cover, fuel filter, fuel
tank, canister).(Refer to Ge ...
Other information:
Hyundai Santa Cruz 2021-2025 Owners Manual: Winter Precautions
Use high quality ethylene glycol coolant
Your vehicle is delivered with high
quality ethylene glycol coolant in the
cooling system. It is the only type of
coolant that should be used because it
helps prevent corrosion in the cooling
system, lubricates the water pump and
prevents freezing. Be s ...
Hyundai Santa Cruz (NX4A OB) 2021-2025 Service Manual: Repair procedures
- Refrigerant System Service Basics
Refrigerant Identification
• Do not mix HFO-1234yf (R-1234yf) in the vehicle with other refrigerant, such as R-12, R-134a and etc.
• Use only service equipment that is U.L-listed and is certified to
meet the requirements of SAE standards to recover a ...
