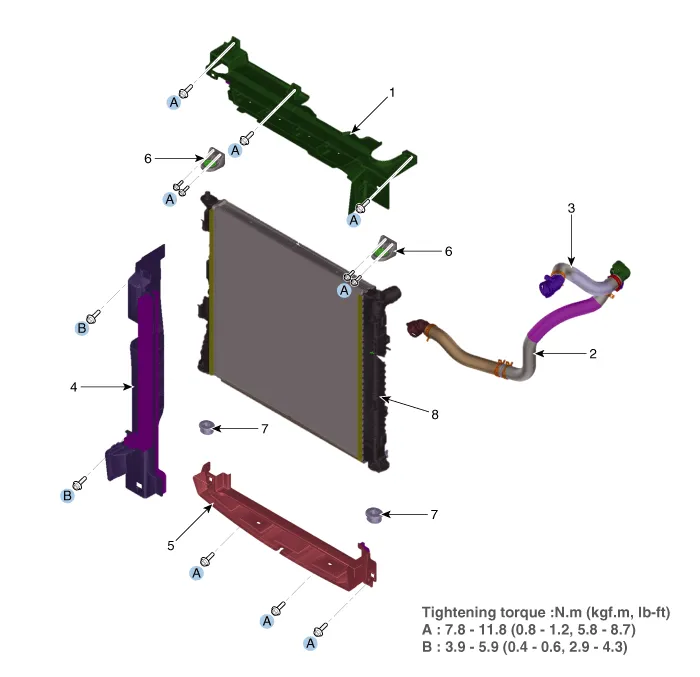
Hyundai Santa Cruz: Cooling System / Radiator

1. Radiator upper air guard
2. Radiator lower hose
3. Radiator upper hose
4. Radiator RH side air guard
5. Radiator lower air guard
6. Radiator upper mounting bracket
7. Radiator lower mounting insulator
8. Radiator
1.Remove the cooling fan & radiator assembly.(Refer to Cooling System - "Cooling Fan")
2.Remove the radiator assembly.
3.Install in the reverse order of removal.
4.Fill with the coolant. (Refer to Cooling System - "Coolant")

• The coolant must be injected according to the integrated thermal management module (ITM) coolant filling method.
5.Start the engine and check for leaks.
1.Remove the radiator cap, wet its seal with the coolant. and then install it on a pressure tester.
2.Apply a pressure of 122.6 - 152.0 kPa (1.25 - 1.55 kgf/cm², 17.78 - 22.05 psi.).
3.Check for a drop in pressure.
4.If the pressure drops, replace the cap.
1.Wait until the engine cools down completely and then carefully open the reservoir tank cap. Fill radiator with the coolant and then install the pressure tester.
2.Raise the pressure of pressure tester to approximate 122.6 - 152.0 kPa (1.25 - 1.55 kgf/cm², 17.78 - 22.05 psi.).
3.Check the coolant leakage and drop in pressure.
4.Remove the pressure tester and then reinstall the radiator cap.

• Check whether the engine oil is mixed with the coolant.
 Cooling Fan
- Components
1. Cooling fan2. Cooling fan shroud3. Cooling fan motor
- Removal and Installation
1.Disconnect the battery negative terminal.
2.Remove the air cleaner assembly.(Refer to I ...
 Reservoir Tank
- Removal and Installation
1.Disconnect the over flow hose (A) and reservoir tank hose (C).
2.Remove the reservoir tank (B).Tightening torque :7.8 - 11.8 N.m (0.8 - 1.2 kgf.m, 5.8 - 8.7 lb-ft)
...
Other information:
Hyundai Santa Cruz 2021-2025 Owners Manual: All Season & Summer Tires
All Season Tires
HYUNDAI specifies all season tires
on some models to provide good
performance for use all year round,
including snowy and icy road conditions.
All season tires are identified by ALL
SEASON and/or M+S (Mud and Snow) on
the tire sidewall. Snow tires have better
snow traction th ...
Hyundai Santa Cruz 2021-2025 Owners Manual: Lower Anchors and Tether for
Children (LATCH System)
The LATCH system holds a Child
Restraint System during driving and in
an accident. This system is designed
to make installation of the Child
Restraint System easier and reduce
the possibility of improperly installing
your Child Restraint System. The LATCH
system uses anchors in the vehicle an ...
